Yes, you can often recover a formatted hard disk, but your next moves are absolutely critical. If you've just done a 'Quick Format,' your files are likely still there—the drive's table of contents was erased, but not the data itself. The key is to immediately stop using the drive to prevent your operating system from writing new data over your old files.
Your First Moves After Formatting a Hard Drive
That gut-wrenching moment you realize you've formatted the wrong drive is something many of us have experienced. Panic sets in, but what you do in the next few minutes will make or break your chances of getting that data back.
The golden rule is simple: stop all activity on the drive immediately.
Every second that drive stays connected and running, your OS could be writing temporary files, log updates, or any number of small bits of data. Each write operation is like paving over the spot where your "lost" files are sitting, making them permanently unrecoverable.

Quick Format vs. Full Format
Your odds of success hinge on what kind of format happened. Knowing the difference helps set realistic expectations right away.
- Quick Format: This is the usual suspect in accidental formatting. It's fast because all it does is delete the file allocation table—the drive's index. Your actual data is left untouched, just waiting to be overwritten. If this is what happened, your chances of recovery are excellent, provided you act fast.
- Full Format (or Secure Erase): This is a much bigger problem. A full format doesn't just wipe the index; it scans the disk for bad sectors and often writes zeros across the entire drive. This process actively destroys the original data, and recovery with standard software becomes next to impossible.
The good news? Most operating systems, including Windows and macOS, default to a quick format. This gives you a fighting chance.
The core principle of data recovery is that formatting rarely erases data immediately. It just removes the pointers to that data. Your files are still there, waiting to be found, until they are overwritten by new information.
The Most Important Safety Step
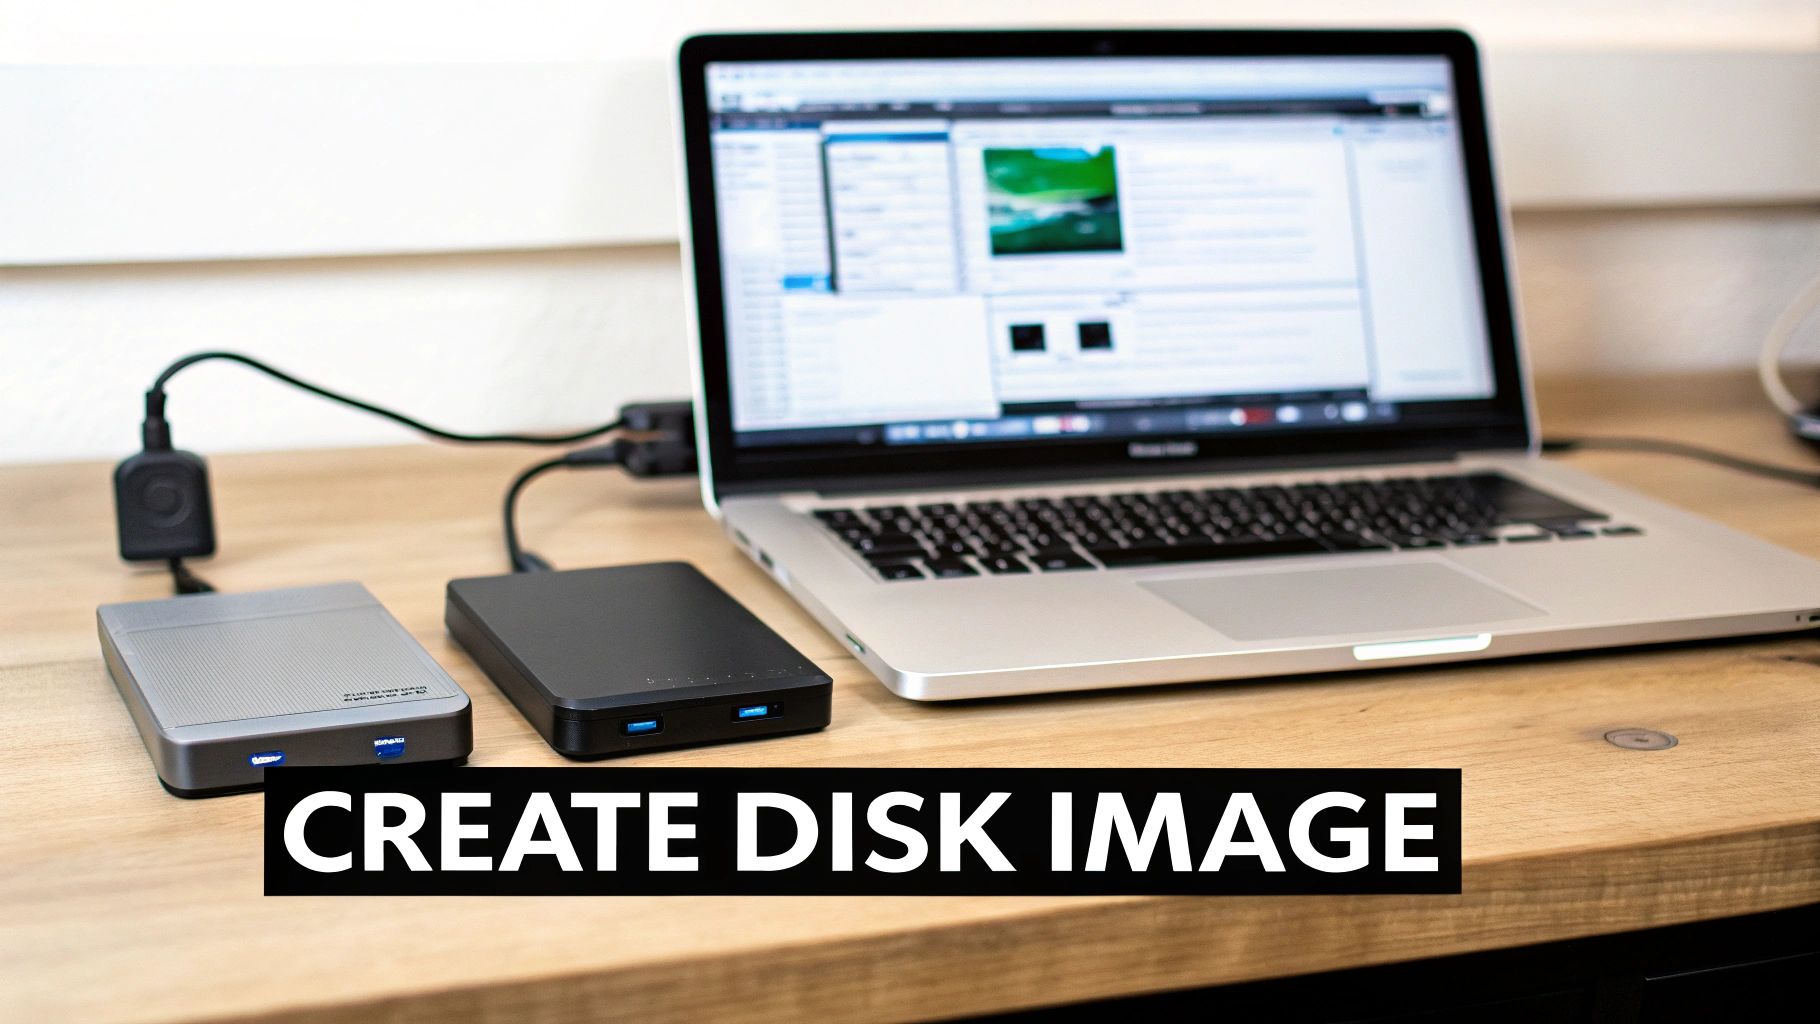
Before you even think about running recovery software, you need to create a bit-by-bit copy of the entire drive. This is called a disk image, and it's a non-negotiable step for anyone serious about getting their data back.
Why? Trying to recover files directly from the formatted drive is incredibly risky. A software bug, a power flicker, or one wrong click could write new data and permanently destroy what you're trying to save.
Creating a disk image is like making a perfect clone of a patient before a complex surgery. You can then work on the clone—the disk image file—without ever touching the original drive again. This preserves the fragile state of your lost data and lets you try multiple recovery tools or techniques without fear. Tools like ddrescue are built for this, meticulously copying data even from failing sectors. This single step transforms your recovery attempt from a high-stakes gamble into a methodical, professional process.
Right, let's get into the most critical first step in any data recovery mission: creating a safe, bit-for-bit image of the formatted drive. Before you even think about running recovery software, this is your absolute priority.
It’s the one thing professional data recovery specialists do without fail, every single time. Why? Because attempting to recover files directly from the source drive is a recipe for disaster. Think of it this way: any software you run could have a bug, a power flicker could corrupt the drive further, or one wrong click might write new data over the very files you're desperate to get back.
An image creates a perfect, stable clone of your drive. It’s a digital snapshot that lets you work on the recovery process without ever touching—and potentially damaging—the original disk again.
Why You Can’t Just Copy and Paste
I know what you might be thinking: "Can't I just drag the files over to another drive?" Unfortunately, no. After a format, the file system's index—its table of contents—is gone. Your operating system looks at the drive and sees nothing but empty space, so there are no files to copy.
A disk image is fundamentally different. It clones the entire drive, sector by sector, including all that "empty" space where your lost data is still lingering. This process creates an exact replica of the drive's current state, which is vital because those underlying data structures are incredibly fragile.
Even if you’re sure the drive is physically healthy, imaging is still the only safe way to proceed. For a deeper dive into physical drive issues, you can learn more about how to recover from hard disk failure in our guide on that topic.
Picking the Right Tool for the Job
You’ll need specialized software for this. While there are a few options out there, the go-to tool for this kind of work is ddrescue. It's a powerful, open-source utility designed specifically for data recovery scenarios.
What makes it so good? Unlike a standard cloning tool, ddrescue is built to handle read errors gracefully. If your formatted drive has some bad sectors or is starting to fail physically, ddrescue won't just give up. It intelligently copies the easy-to-read data first and then circles back to patiently retry the problem areas, maximizing the amount of data you can pull from a damaged disk.
The single biggest mistake you can make in data recovery is overwriting your source data. By working from an image, you completely eliminate this risk. The original drive gets put on a shelf, safely preserved in its original state.
How to Create the Disk Image
This part requires your full attention. One typo in a command could wipe the wrong drive, so take your time and double-check everything.
You'll need a destination drive with enough free space to hold the entire image. For instance, if you're imaging a 500 GB formatted drive, your destination drive needs at least 500 GB of free space. Simple as that.
Here’s a practical workflow using ddrescue:
- Get Your Drives Ready: First, you’ll need a computer running Linux. A bootable USB stick with a distribution like Ubuntu works perfectly for this. Connect both the formatted (source) drive and your empty destination drive.
- Identify the Drives: Open a terminal and run the
lsblkcommand. This will list all your connected drives (e.g.,/dev/sda,/dev/sdb). This is the most critical step. Carefully identify which is your source and which is your destination. Getting this wrong is catastrophic. - Run the
ddrescueCommand: The command itself is fairly straightforward. You'll tell it the source, the destination file for the image, and a logfile. That logfile is your safety net—if the process gets interrupted, you can resume it right where it left off without starting over.
Here’s what a typical command looks like:
sudo ddrescue -f -n /dev/sda /media/user/destination_drive/image_file.img logfile.log
-f: This tellsddrescueto overwrite the output file if it already exists.-n: This "no-scrape" option does a quick first pass, grabbing all the easy data first without getting bogged down on bad sectors.
Once this first pass is done, you can run it again without the -n to try a more intensive pass on any problem areas it logged. From this moment on, your original drive is safe. All your recovery attempts will be performed on the image_file.img you just created.
Picking the Right Tool for the Job
You’ve successfully imaged your formatted drive. That’s a huge win. The immediate danger is over, and now you can shift from panic mode to strategy. The next move is all about choosing the right software to bring your data back from the brink.
This decision is probably the most critical one you'll make in the entire process. The software landscape is packed with options, from free, no-frills command-line tools to sophisticated commercial suites. There's no magic bullet here—the "best" tool is simply the one that's right for your specific problem.
Partition Recovery vs. File Carving: Two Sides of the Same Coin
First, you need to understand the two main ways these tools work. One is like finding the building's blueprint, while the other is a door-to-door search.
-
Partition Recovery: This is the clean, elegant solution you’re hoping for. A tool like TestDisk scans your drive image for the ghost of the old partition table. If it finds it, it can essentially "undelete" the entire partition. All your files, folders, and original filenames pop back into existence, perfectly intact. It’s the ideal outcome after an accidental quick format.
-
File Carving: This is the brute-force method for when things are more chaotic. When the partition structure is toast, a file carver like PhotoRec (which comes with TestDisk) gets to work. It meticulously scans the drive image sector by sector, looking for known file signatures—the digital fingerprints that say "I'm a JPG" or "I'm a PDF." It’s amazing at finding files on a hopelessly scrambled drive, but there's a catch: you'll lose all original filenames and the entire folder structure.
Think of it this way: Partition recovery is like finding the library's lost card catalog and putting every book back on its proper shelf instantly. File carving is like sifting through a giant pile of loose pages and manually reassembling the books one by one.
Matching the Tool to Your Situation
Your choice of software really comes down to your technical skill and what’s at stake. If you just accidentally formatted a drive with family photos, starting with a free tool is a no-brainer.
Here’s a look at TestDisk in action, trying to piece together a drive's partition structure.
As you can see, the command-line interface is incredibly powerful, but it’s not for the faint of heart. One wrong move, and you could make things worse. You have to read every prompt carefully.
For tougher cases—like a partially overwritten drive, a failing SSD, or a complex RAID setup—you'll likely need to bring in the big guns. Commercial software like R-Studio is what the pros use for a reason. It has far more advanced scanning algorithms, can virtually reconstruct broken RAID arrays, and gives you deep-level tools like hex editors to see what’s really going on. It’s an investment, but when your data is irreplaceable, it's worth it.
The most important thing is to match the tool to the problem. Firing up a file carver when a simple partition recovery would have worked is like using a sledgehammer to open a locked door. You’ll get in, but you’ll destroy the doorframe in the process. Always try partition recovery first.
The stakes get exponentially higher when you're dealing with high-value digital assets like cryptocurrency wallet files. A formatted drive in the crypto world can be a financial catastrophe. In 2025 alone, 158,000 individual wallet compromises were reported, resulting in over $713 million in losses—many of which started with a simple formatted drive.
While it seems impossible, experts can often use tools like TestDisk or specialized AI-driven carvers to pull wallet files for Electrum or Exodus right off a formatted drive. You can find more details in these crypto recovery statistics and trends. It’s a perfect example of how combining deep expertise with the right software can turn a total loss into a full recovery.
Here's a quick rundown of some of the most common tools to help you decide which one might be right for you.
Comparison of Top Data Recovery Tools
This table breaks down some of the most popular data recovery tools, comparing their features, best use cases, and the skill level required to use them effectively. It's a good starting point to help you narrow down your options based on your specific needs.
| Tool Name | Primary Function | Best For | User Level | Price |
|---|---|---|---|---|
| TestDisk | Partition Table Recovery | Recovering lost partitions after an accidental format; fixing boot sectors. | Intermediate | Free |
| PhotoRec | File Carving | Finding individual files when the filesystem is severely damaged. | Beginner | Free |
| Recuva | File Undelete & Basic Scan | Quick recovery of recently deleted files from a healthy filesystem. | Beginner | Free / Pro ($25) |
| R-Studio | Comprehensive Data Recovery & RAID Rebuild | Complex scenarios: RAID, overwritten files, severely damaged drives. | Advanced | Starts at $50 |
| ddrescue | Disk Imaging | Creating a bit-for-bit clone of a failing or damaged hard drive. | Advanced | Free |
Ultimately, there isn't a one-size-fits-all answer. The best approach is methodical: start with the simplest, most direct tool for your problem (like TestDisk for partition recovery) and only escalate to more powerful or complex methods if the initial attempts don't work. This tiered strategy gives you the best shot at getting your files back without making a bigger mess.
Right, you've got your disk image safely tucked away. Now comes the part where we actually try to pull your files back from the brink.
How we tackle this depends entirely on what the format did to your drive's structure. We'll start with the cleanest, most hopeful approach first. If that doesn't work, we'll roll up our sleeves and get a bit more aggressive.
This flowchart gives you a bird's-eye view of the game plan. We always start with the least destructive method, like trying to rebuild the partition table, before escalating to more granular (and messy) techniques.
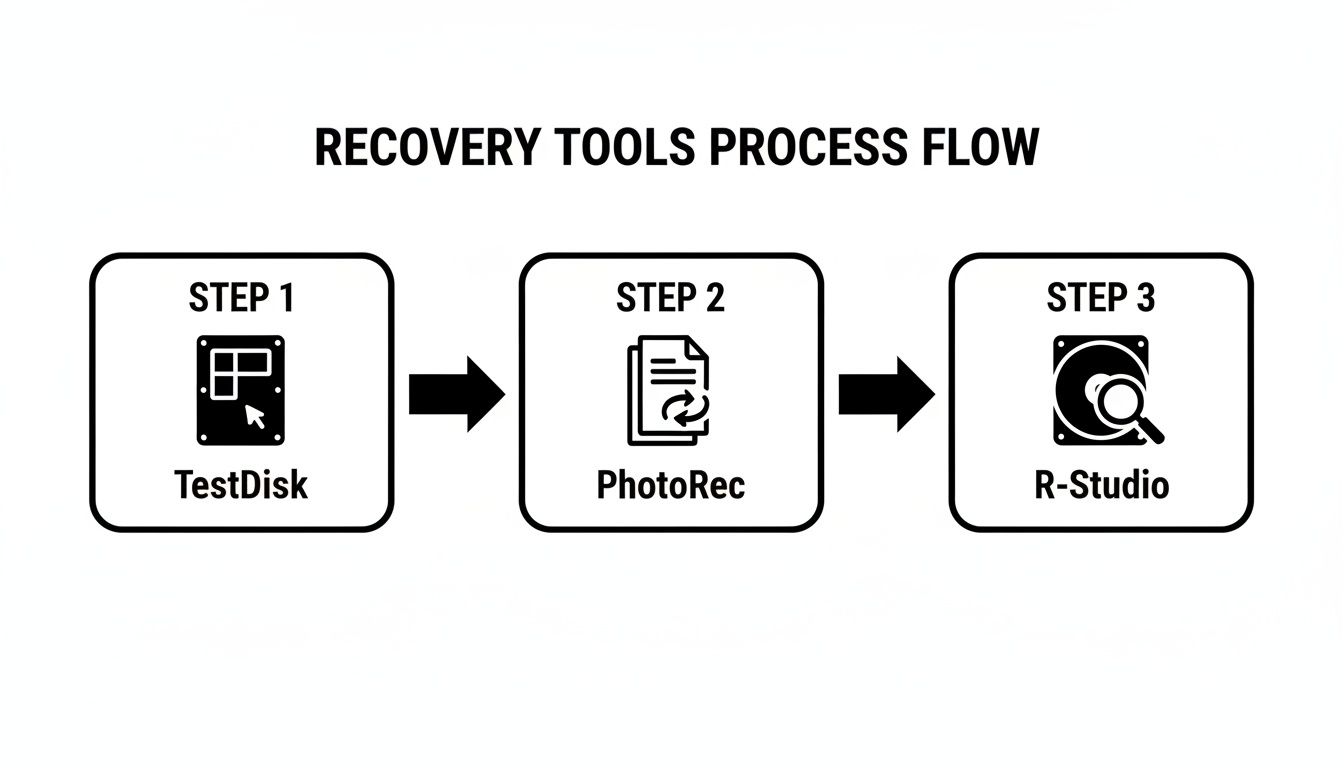
As you can see, the path is logical: start with TestDisk for a clean partition recovery. If that fails, move to a more brute-force approach with PhotoRec. For the really tough cases, a professional-grade tool like R-Studio might be necessary.
First Shot: Rebuilding the Partition Table with TestDisk
The absolute best-case scenario is restoring the original partition table. Think of it like finding the drive's lost table of contents. If you can do this, everything—your folders, your filenames, your entire structure—snaps back into place. Our go-to tool for this job is TestDisk.
Don't let the command-line interface scare you. TestDisk is a powerhouse that methodically scans your disk image, hunting for the ghost of that old partition structure.
Here's how it generally goes:
- You'll launch TestDisk and point it at the disk image file (
.imgor.dd) you created. - It will ask for the partition table type, which is almost always
[Intel/PC partition]for modern drives. - Select the
[Analyse]option to let it search for lost partitions. If the first pass comes up empty, run the[Deeper Search]. - If TestDisk strikes gold and finds your old partition, you can mark it as bootable/primary and select
[Write]to restore the partition table to the image.
When this works, it feels like magic. You mount the image, and it's as if the format never happened. This trick is especially effective after a "quick format" on common filesystems like NTFS or FAT32.
Plan B: File Carving with PhotoRec
So, what happens if TestDisk comes up empty? This is common if the beginning of the drive was overwritten or if the filesystem was badly scrambled. Now we shift tactics. We stop looking for the table of contents and start a "door-to-door" search for survivors. This is called file carving, and we'll use PhotoRec (which comes bundled with TestDisk).
PhotoRec completely ignores the broken filesystem. Instead, it scans the raw data on your image, looking for recognizable file "signatures"—the unique headers that mark the beginning of a JPG, a DOCX, or an MP4 file. When it finds one, it "carves" out the data that follows.
The upside is that it finds a lot. The downside? The results are a mess. Because it has no filesystem to reference, all recovered files get dumped into one giant folder with generic names like f12345.jpg. You lose all original filenames and folder structures.
Here's a pro tip that will save you from a massive headache: Before you start the scan in PhotoRec, go into the options and filter for the specific file types you need. If you only want your photos and documents back, tell it to ignore everything else. This one step can cut down the clutter by 90% and save you hours of sifting through system files you don't care about.
How Your Filesystem Changes the Game
Not all formats are created equal. The filesystem your drive was using has a massive impact on your odds of a clean recovery.
- NTFS (Windows): This is your best-case scenario. NTFS keeps a backup of the Master File Table (MFT), which is the drive's master index. This backup gives tools like TestDisk a fantastic shot at a full partition recovery.
- FAT/exFAT (USB Drives, SD Cards): These are much simpler, leaving less behind to work with. While partition recovery is sometimes possible, you're more likely to end up needing to file-carve with PhotoRec.
- ext4 (Linux): As a robust journaling filesystem, ext4 has a good chance of partition recovery. However, its complex structure can sometimes make raw file carving less reliable than with NTFS or FAT.
No matter the filesystem, the process is the same: always work from your disk image. Start with partition recovery, and only if that fails, escalate to a targeted file-carving scan.
This isn't just about documents and photos, either. Imagine accidentally formatting a drive holding your Bitcoin wallet—a catastrophic mistake that happens more often than you'd think. In 2025 alone, one recovery firm managed to restore over $2.5 million in crypto from scenarios just like this. The single largest recovery was a wallet worth $1.5 million that had been considered lost for years. As you can read about how experts recover lost crypto, professionals use advanced forensic tools to find faint traces of wallet files, seed phrases, or private keys that survive even a format.
When to Call in a Professional
Look, DIY data recovery is fantastic, and it can be incredibly rewarding to pull your own files back from the brink. But there are absolutely moments when the smartest thing you can do is power down the drive, step away from the keyboard, and call an expert.
Knowing when to stop is just as critical as knowing where to start. Pushing on when you're out of your depth can quickly turn a recoverable situation into a permanent, heartbreaking loss. This isn't about giving up; it’s about making a strategic call to protect what you can't replace.
Obvious Signs of Physical Failure
This one is simple. If your drive is making weird noises, it's game over for DIY. Stop immediately.
Any of these sounds mean it's time for professional help, no exceptions:
- Clicking or Ticking: This is the infamous "click of death." It's the sound of the read/write heads struggling and failing, a sure sign of severe mechanical trouble.
- Grinding or Scraping: This is a terrifying noise for a reason. It means the drive's heads are physically scraping the magnetic platters, literally shredding your data with every rotation.
- Whirring or Beeping: If the drive sounds like it's trying to spin up but can't, or it just beeps, the motor has likely failed.
In any of these scenarios, the drive has to be opened in a specialized cleanroom. A single speck of dust in the wrong place can cause catastrophic damage. Don't even think about opening it yourself.
When High-Value Digital Assets Are at Stake
The value of the lost data completely changes the game. Losing your vacation photos is one thing, but losing access to significant financial assets can be devastating. This is especially true when it comes to cryptocurrency wallets.
Trying to recover a wallet.dat file, a keystore, or even just fragments of a seed phrase from a formatted drive is a whole different ballgame. These files are often tiny, encrypted, and have a unique structure. Generic file-carving tools will almost certainly miss them or recover a corrupted, useless version.
This is where you need specialized expertise. A professional recovery service uses targeted algorithms designed specifically to find and piece together fragmented wallet data, all while keeping your financial information private and secure.
Formatted hard disks are a known disaster for crypto holders. In 2025, personal wallet compromises accounted for 37-44% of the $3.4 billion in total crypto thefts, often stemming from user error or hardware failures that led to wiped drives. Yet, recovery is viable; services have proven they can restore assets even from wallets that have been inaccessible for years. You can discover more insights about these crypto hacking trends and recovery successes on Chainalysis.
Complex Data Corruption or Overwritten Files
So you ran a scan, and you got files back… but they're a complete mess. Critical documents won't open, your videos are garbled, and databases are hopelessly corrupted. What gives?
This usually happens if the drive was used—even briefly—after the format, causing new data to partially overwrite the old.
Professionals have advanced forensic tools that let them go deeper, manually reconstructing files by digging into the raw hexadecimal data. They can repair damaged file headers, splice together fragmented data streams, and rebuild databases in ways consumer software just can't handle.
If your recovered data is unusable and you've hit a wall with every tool you've tried, it's time to bring in the pros. Engaging experts who know how to recover formatted hard disk data at this granular level is your best—and likely last—shot.
Common Questions About Hard Drive Recovery
You’ve done the heavy lifting—you’ve imaged the drive and run the recovery scans. But now you’re staring at the results, and a whole new set of questions probably pops into your head. It’s completely normal.
Let’s walk through some of the most common things people ask after trying to recover a formatted hard disk. Getting straight answers will help you understand what you're seeing and decide what to do next.
Can I Recover Data After a Full Format?
This is the big one, and it all comes down to one crucial detail: was it a "Quick Format" or a "Full Format"?
Most of the time, when you accidentally format a drive, you’re doing a Quick Format. This process is surprisingly gentle. All it does is delete the file index—the drive’s table of contents. The actual data, your files, are left untouched and are almost always highly recoverable.
A Full Format is another beast entirely. It’s a deliberately destructive process that doesn’t just remove the index; it actively overwrites every single sector on the drive, usually with zeros. This is often called a "secure erase," and it does exactly what it says. Once that happens, the original data is shredded beyond the reach of any software-based recovery tool.
Thankfully, most operating systems default to a quick format, so you’re usually in the clear after an accidental click. But if you know a full format was run, even professional services face a near-impossible task.
Why Are My Recovered Files Corrupted or Unnamed?
This is probably the most frustrating part of the whole process. You see a list of recovered files, but they’re all named something like f123456.jpg and half of them won't open. It feels like a failure, but it’s actually a predictable outcome of how certain tools work.
Tools like PhotoRec are "file carvers." They ignore the broken filesystem and instead scan the raw data for file signatures—the digital markers that identify the start and end of a specific file type (like a JPG or a DOCX). It’s an incredibly powerful way to find orphaned data.
The catch? These tools have zero access to the old filesystem's metadata.
That means the original filenames, the folder structure they lived in, and their creation dates are all gone. The software finds the data but has no context for it, so it assigns a generic name and drops everything into one giant folder.
Corruption happens for a similar reason. If any new data was written to the drive after the format—even something as small as a system log file—it might have landed right on top of a piece of one of your old files. When the recovery tool tries to put that file back together, it hits that new chunk of data, and the result is a broken, unreadable file.
Is It Possible to Recover Data from an SSD?
Trying to get data back from a formatted Solid State Drive (SSD) is a whole different ballgame than with a traditional Hard Disk Drive (HDD). The single biggest hurdle is a feature called TRIM.
TRIM is a command that helps an SSD manage its data and maintain performance. When you delete a file or format the drive, the operating system sends a TRIM command to the SSD’s controller, essentially telling it, "You can permanently erase these blocks; they're not needed anymore."
Here’s why that’s a problem for recovery:
- It’s Fast: The SSD controller acts on this command almost instantly, often in the background without you even knowing.
- It’s Permanent: Once those blocks are electronically cleared, the data is gone for good. No software on earth can bring it back.
The only sliver of hope you have to recover a formatted hard disk that’s an SSD is to act immediately—and I mean instantly. Powering the drive down the second you realize the mistake might prevent the TRIM command from completing its work across the entire drive, but even then, your chances are much, much lower than with an HDD.
How Long Does the Recovery Process Usually Take?
If there's one thing data recovery requires, it's patience. The whole process, from start to finish, almost always takes longer than you think. Rushing things is a surefire way to make a mistake.
First off, just creating the disk image can take a significant amount of time. Imaging a healthy 1 TB drive might take 3-5 hours. If the drive has bad sectors and you're using ddrescue, be prepared to wait. The tool might spend over a day patiently re-reading failing parts of the drive to get every last bit of data.
Then comes the scan itself. A simple partition scan might be done in an hour. But a deep, file-carving scan on that same 1 TB image? That could easily run for 12-24 hours, or even longer, as it meticulously analyzes every single block. It’s a slow, methodical process that you just can’t speed up.
If you've hit a wall trying to recover high-value assets like crypto wallets, the DIY path may have reached its limit. Wallet Recovery AI provides specialized, confidential assistance to restore access to your digital funds using advanced techniques that go far beyond standard tools. To see if our experts can help, visit Wallet Recovery AI to start your case.
Leave a Reply