When your WD drive suddenly stops working, don't assume the worst. More often than not, the problem isn't a catastrophic failure but something much simpler. The first things to check are always the power adapter, the USB or SATA cable, and the port you're using. You'd be surprised how many "dead" drives I've seen spring back to life with just a new cable.
Initial Checks for a Non-Responsive WD Hard Drive
That sinking feeling when your Western Digital drive isn't detected is all too familiar, but it's important to approach the problem methodically. Before you even think about data recovery software or professional services, run through these basic diagnostic steps.
I can't tell you how many times the real culprit was a frayed USB cord or a power adapter that had given up the ghost. These parts are constantly plugged, unplugged, and bent—they fail far more often than the intricate mechanics inside the drive itself.
The Power and Connection Test
First things first: make sure the drive is actually getting power. If you have an external drive like a WD My Book or Elements, check the AC adapter. Does the little light on the power brick turn on? If not, try another wall outlet before you do anything else.
Next, turn your attention to the data cable. These are surprisingly fragile.
- Swap the Cable: Get a brand new or known-working USB or SATA cable and swap it out. A cable can look perfectly fine on the outside but have broken wires inside.
- Change the Port: Don't just re-plug it into the same port. Try a different one, especially on a desktop. Use one of the USB ports on the back, which are connected directly to the motherboard, as they provide more stable power than front-panel ports or external hubs.
- Verify Internal Connections: For an internal 3.5-inch drive, open your PC case and double-check that both the SATA data cable and the SATA power cable are firmly seated in the drive and on the motherboard/power supply.
Pro Tip: If your external WD drive uses a USB-Y cable (the one with two USB-A plugs), you must have both plugged in. One handles data and some power, but the second one is essential for providing the extra juice the drive needs to operate correctly.
Listen Closely to Your Drive
The sounds a hard drive makes—or doesn't make—are your best early diagnostic tool. Find a quiet room, plug the drive in, and just listen for a few seconds.
A healthy drive spins up with a smooth, soft whirring sound, followed by faint, occasional "thinking" or seeking noises. That's all perfectly normal. What you need to listen for are the sounds that signal serious trouble.
To help you diagnose what you're hearing, here's a quick checklist of common sounds and what they likely mean.
Quick Diagnostic Checklist for Your WD Drive
| Symptom | Potential Cause | What to Check First |
|---|---|---|
| No sound or vibration at all | No power or a dead circuit board (PCB) | Power adapter, outlet, and cables. |
| Repetitive clicking or tapping | Severe mechanical failure ("Click of Death") | Turn it off immediately. Don't re-power. |
| Loud grinding or scraping | Head crash; read/write heads are scraping the platters | Turn it off immediately. This is critical damage. |
| A constant, high-pitched whine or beep | Seized motor spindle; the platters can't spin | Turn it off. The motor is stuck. |
The sounds tell a story, and you need to listen to it.
If you hear any clicking, grinding, or scraping noises, shut the drive off immediately. Leaving it powered on will only grind the internal components into dust, destroying your data and making a professional recovery exponentially harder, if not impossible.
Test on Another Computer
This is one of the most important troubleshooting steps. By connecting your WD drive to a completely different computer, you can quickly determine whether the problem is with the drive or your original machine.
If the drive pops up and works fine on the second computer, great! The issue is likely with your first computer's drivers, operating system, or a faulty USB port. But if the drive still isn't recognized or makes those same scary noises, the evidence points squarely at a problem with the drive itself. This simple test can save you hours of wasted time trying to fix your PC's software when the hardware was the real issue all along.
So, you've already run through the basic checks—the cables are snug, the power is on—but your WD drive is still giving you the silent treatment. Now comes the most important part of the entire process: figuring out why it's failing.
Getting the diagnosis right is everything. It’s the fork in the road that decides whether you can fix this yourself with a bit of software magic or if you need to call in the professionals. Broadly speaking, you're dealing with one of two culprits: a logical failure or a physical failure.
A logical failure is a software problem. The drive itself is mechanically sound, but its data has become a jumbled mess your computer can't read. A physical failure is much more serious—it means a component inside the drive has broken, worn out, or been damaged.
This flowchart can help you start zeroing in on the cause based on what the drive is (or isn't) doing.
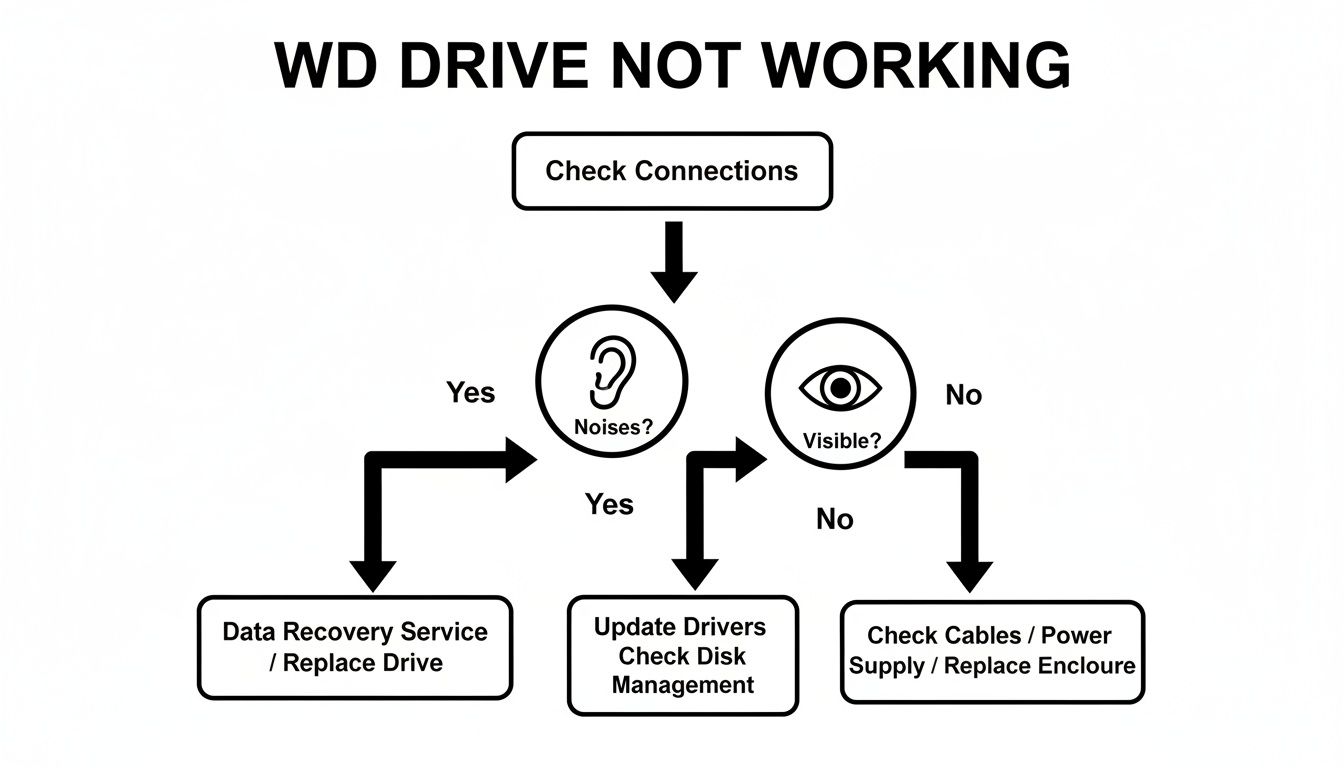
As you can see, what you hear and what your computer sees are the two biggest clues for telling these two problems apart.
Identifying a Logical Failure
A logical failure can be incredibly frustrating because the drive often seems like it's working. It powers on, you can feel the platters gently spinning, and the little activity light might even be blinking away. Yet, it’s nowhere to be found in your File Explorer or Finder.
Here are the classic signs of a logical problem:
- The drive spins up, but no drive letter appears.
- Your OS pops up a message asking you to format the disk. (Warning: Never, ever do this if you need the data back.)
- The drive shows up in system utilities, but its status is "RAW" or "Unallocated."
- You can see the drive, but entire folders or specific files have vanished or are unreadable.
These symptoms usually point to a corrupted partition table, an accidental format, a virus, or even a driver update gone wrong. This is where we need to look a little deeper using your computer's own built-in tools.
Using System Tools for a Deeper Look
Your operating system has utilities that see connected hardware on a much lower level than your standard file manager. They can often spot a drive even when it’s not properly mounted.
- On Windows: Open Disk Management by right-clicking the Start button. Find your WD drive in the graphical list. If it’s there but has no drive letter or is marked with a "RAW" file system, that's a classic sign of a logical issue.
- On macOS: Launch Disk Utility from your Applications > Utilities folder. Your WD drive should show up on the left. Clicking it will display its partition map and format. Any errors reported here almost always point to a logical failure.
Seeing the drive in these tools is a good thing. It means the computer is talking to the drive's electronics, and the problem is with the data structure, not the hardware itself. This can also happen with firmware corruption, a known issue on some older WD models.
For instance, some of Western Digital’s external drives from the early 2010s, like the infamous WD20EARS, had major firmware flaws. Data recovery forums were flooded with reports of failure rates as high as 20-30% within two years, often because of aggressive power management that led to head crashes. While WD eventually fixed this, millions of those drives are still out there, serving as a reminder of how firmware can be a critical point of failure. You can find plenty of historical data on drive reliability rates if you're curious.
Spotting a Physical Failure
Physical failures are usually less subtle and far more serious. The signs are often dramatic, and they are your cue to power the drive down immediately and leave it off.
Here's the most important rule in data recovery: never run software on a physically failing hard drive. That's like telling someone with a broken leg to run a marathon. You will only cause more damage, likely making the data permanently unrecoverable.
The symptoms of physical failure are hard to ignore:
- The "Click of Death": A loud, rhythmic clicking or ticking sound.
- Grinding or Scraping: Any noise that sounds like metal-on-metal is a sign the read/write heads have crashed onto the platters.
- No Power or Spin-Up: The drive is completely dead. No vibration, no sound, no lights.
If you experience any of these, your only move is to unplug the drive. No software on earth can fix this. The drive needs to be opened in a professional cleanroom for repair before anyone can even attempt to retrieve the data.
Software-Based Recovery for Logical Failures
So, you’ve run through the diagnostics and it looks like a logical failure. This is actually good news. If the drive’s hardware is fine but the data structure is scrambled, you have a very real shot at getting your files back on your own.
But before you do anything else, you need to understand the single most important rule of data recovery: never install recovery software or save recovered files onto the affected WD drive. Writing any new data to the disk can permanently overwrite the very files you're trying to get back.
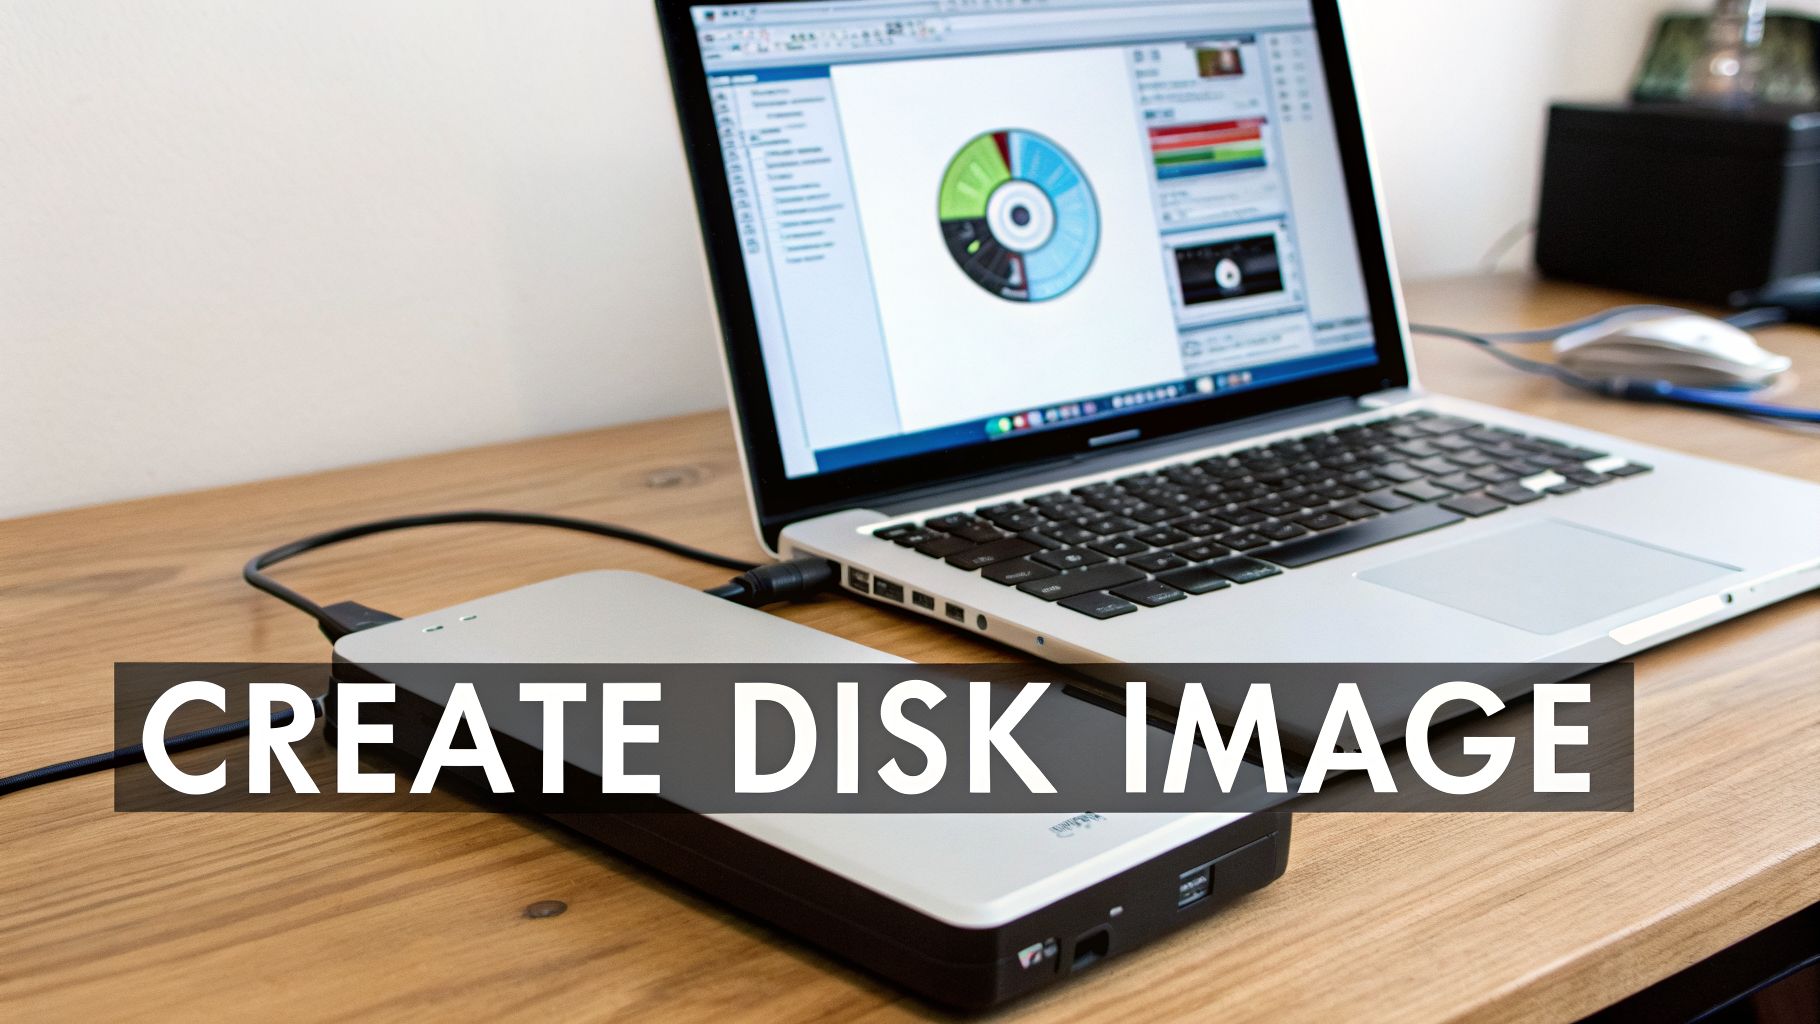
Your First Move: Create a Disk Image
Before you even think about running a scan, your first action must be to create a disk image. This is an exact, sector-by-sector copy of your failing drive, saved as a single file onto a separate, healthy drive. Think of it as making a perfect digital clone of the patient before you begin surgery.
Working from an image instead of the original drive is a non-negotiable safety measure.
- It protects the original drive. You can set the failing WD drive aside, safe from any further stress or potential damage. All recovery work happens on the image file.
- It gives you unlimited attempts. If one tool or scan setting doesn't work, you can just start over on the pristine image with a different approach. No risk, no harm done.
Most professional-grade recovery tools have this function built-in. Just make sure your destination drive has enough free space to hold the entire capacity of the sick drive. To image a 4 TB drive, you need at least 4 TB of free space.
Choosing the Right Recovery Software
The market is full of data recovery tools, but they are not all created equal. Many free programs are just teasers, letting you recover maybe 500 MB before hitting a paywall, and they often lack the powerful scanning engines needed for messy situations.
Here’s what to look for in a capable tool:
- Disk Imaging: As we just covered, this is mandatory for a safe process.
- "RAW" and Corrupted Partition Support: The software must be able to scan the drive at a deep level, even if the operating system can't see a file system.
- File Signature Scanning: This is a lifesaver. Advanced tools can hunt for specific file types (like .JPG, .MP4, or wallet files) by their unique data patterns, completely bypassing a broken file system.
- File Preview: A trustworthy tool will always let you preview files before you recover them. This confirms the file isn't corrupted beyond repair.
I worked with a photographer whose 8 TB WD My Book suddenly appeared as a "RAW" partition, locking them out of all their client photos. By first creating an image and then running a deep scan with professional software, we searched specifically for Canon CR2 file signatures. The tool pieced the photos back together from raw data, recovering their entire shoot and saving their business.
How to Approach Different Logical Problems
Not all logical failures are the same. A simple deleted file is a world away from a corrupted partition table. Your approach will change depending on the scenario.
| Scenario | What Happened | Recovery Chance |
|---|---|---|
| Accidentally Deleted Files | You deleted files and emptied the Recycle Bin. | Very High, as long as you stopped using the drive immediately. |
| Accidental Format | You mistakenly formatted the entire drive. | High, but only if it was a "Quick Format." A "Full Format" is much tougher. |
| "RAW" or Missing Partition | The drive shows up but you can't access it. | Good, but you'll need a "deep scan" to find and rebuild the file structure. |
If your drive is showing up as RAW, you might be tempted to use built-in tools like CHKDSK to "fix" it. Be careful. While these tools have their place, running the wrong command can make the problem much worse.
For a deeper dive into this specific issue, check out our guide on what to do when CHKDSK reports a RAW file system. It explains when system utilities might help and when they are too risky to use.
When your "WD hard drive not working" problem is purely logical, software offers a powerful path to recovery. Just remember to work from an image and choose your tool wisely.
Specialized Recovery for Crypto Wallets
A dead hard drive is always a headache. But when that drive holds your crypto wallet files, the problem escalates from a major inconvenience to a potential financial wipeout. I’ve seen this exact scenario play out far too many times—standard recovery tools just aren't built for this kind of high-stakes work.
The issue is that wallet files are tiny. Think about a Bitcoin wallet.dat, an Ethereum keystore JSON file, or even a simple text backup of your seed phrase. These files are small, easily fragmented, and often tucked away in obscure app data folders. Generic recovery software, which is designed to find big files like photos and videos, can easily miss them.
Why Standard Recovery Fails for Crypto
Most "undelete" or partition recovery scans look for large, intact files by reading standard file system entries. That works great for a 20 MB family photo album or a 2 GB video project. It’s not so great for a 50 KB wallet file you haven't touched in six months, now sitting on a corrupted part of the drive.
Worse, the software might not even recognize the file signature for a .dat or .json file, causing it to skip right over the most valuable data you own. This is a massive blind spot that can trick you into thinking your assets are gone for good when a more focused approach could get them back.
I often work with users of wallets like Exodus or Atomic Wallet who run into this. They’ll save a backup to their WD My Passport, but a power surge or yanking the cable without ejecting corrupts the drive. Because that wallet backup is a small, recently written file, it's often the first thing to get damaged.
A Targeted Approach to Wallet File Recovery
To find these high-value files, you have to ditch the default settings and get specific. You need to run specialized scans configured to hunt for the exact digital fingerprints of crypto wallets.
Here’s a much more effective strategy:
Search by File Extension: Instead of a "scan everything" approach, tell your recovery tool to only look for wallet-related extensions. Common ones include .dat, .json, .keystore, .seed, and even .txt or .pdf if you saved your recovery phrase in one of those formats.
Filter by File Name: If you remember what you named the wallet file (like
my_eth_wallet.jsonor the defaultwallet.dat), use that as a search filter. This cuts down the search time dramatically.Scan for File Signatures (Hex Search): This is the most powerful technique. It involves searching for the unique "magic numbers" or header data that identify a wallet type, even if the filename and extension have been completely wiped. For instance,
wallet.datfiles from Bitcoin and its forks contain specific text strings that a good tool can spot.
This focused method is like using a metal detector tuned specifically for gold instead of one that just beeps at every bottle cap. With WD drives in home and office settings showing yearly failure rates of 3-5%, wallet files are frequently lost. Advanced AI forensics, however, can salvage up to 88% of corrupted WD partitions that hold these files, proving that specialized services can restore access to assets like ETH and prevent them from becoming lost digital relics. You can find more data on hard drive reliability and see how different brands and models compare.
The Security-First Recovery Protocol
Getting the wallet file back is only half the job. The moment you regain access, you must treat the wallet as compromised, especially if you used any third-party software or service. Your only priority should be to move your funds to a new, safe location immediately.
The second you open that recovered wallet, follow this security checklist without fail:
- Work Offline: Before you do anything else, disconnect the computer from the internet. This stops any potential malware on your system from phoning home with your private keys.
- Generate a New, Secure Wallet: On a completely different and trusted device (a clean computer or a new hardware wallet), create a brand-new wallet. Write down and secure its new seed phrase.
- Sweep the Funds: Open the recovered wallet and immediately send 100% of the funds to an address in your new, secure wallet. Do not wait.
- Abandon the Old Wallet: Once the transaction is confirmed, that recovered wallet is dead to you. Never use it or its private keys again. Consider it permanently burned.
This protocol isn’t just a suggestion. It’s the only way to ensure your successful recovery doesn't become a catastrophic theft just moments later.
Knowing When to Call a Professional Recovery Service
Sometimes the most important part of data recovery is knowing when to stop. While software tools are fantastic for sorting out logical problems, trying to force a physically failing drive to work is the quickest way to turn a recoverable drive into a paperweight. This is where DIY efforts must end and a professional needs to step in.
Every time you power on a drive that's making strange noises, you're rolling the dice. The read/write heads could be grinding against the magnetic platters, literally scraping your data into dust. A problem that might have been a simple head replacement can quickly escalate into a catastrophic loss with destroyed platters.
The Telltale Signs of Physical Failure
Some symptoms aren't just suggestions—they are full-blown emergency signals. If your WD drive starts doing any of the following, the only safe move is to power it down immediately and unplug it. No software on earth can fix broken hardware.
These are the definitive signs that you're dealing with severe mechanical failure:
- The "Click of Death": You'll hear a rhythmic, repetitive clicking or tapping. This is the sound of the read/write heads failing to initialize and repeatedly snapping back to their starting position.
- Grinding or Scraping Noises: Any sound that resembles metal scraping against metal is a five-alarm fire. This almost always means the heads have crashed onto the platters and are actively destroying them.
- No Spin-Up: The drive is dead silent and you feel no vibration. This usually points to a seized motor or a major failure on the circuit board (PCB).
- The Drive Was Dropped: Even if it seems to power on, a hard knock can easily misalign the delicate internal parts. Running the drive in this state is incredibly risky.
In my experience, more data is lost by people trying to "just run it one more time" with a clicking drive than by the initial failure itself. The first click is a warning. Every click after that is active damage.
It feels counterintuitive to just stop and do nothing, but it's the most critical thing you can do. You really only get one good shot at recovery from a physical failure, and that shot belongs to a pro.
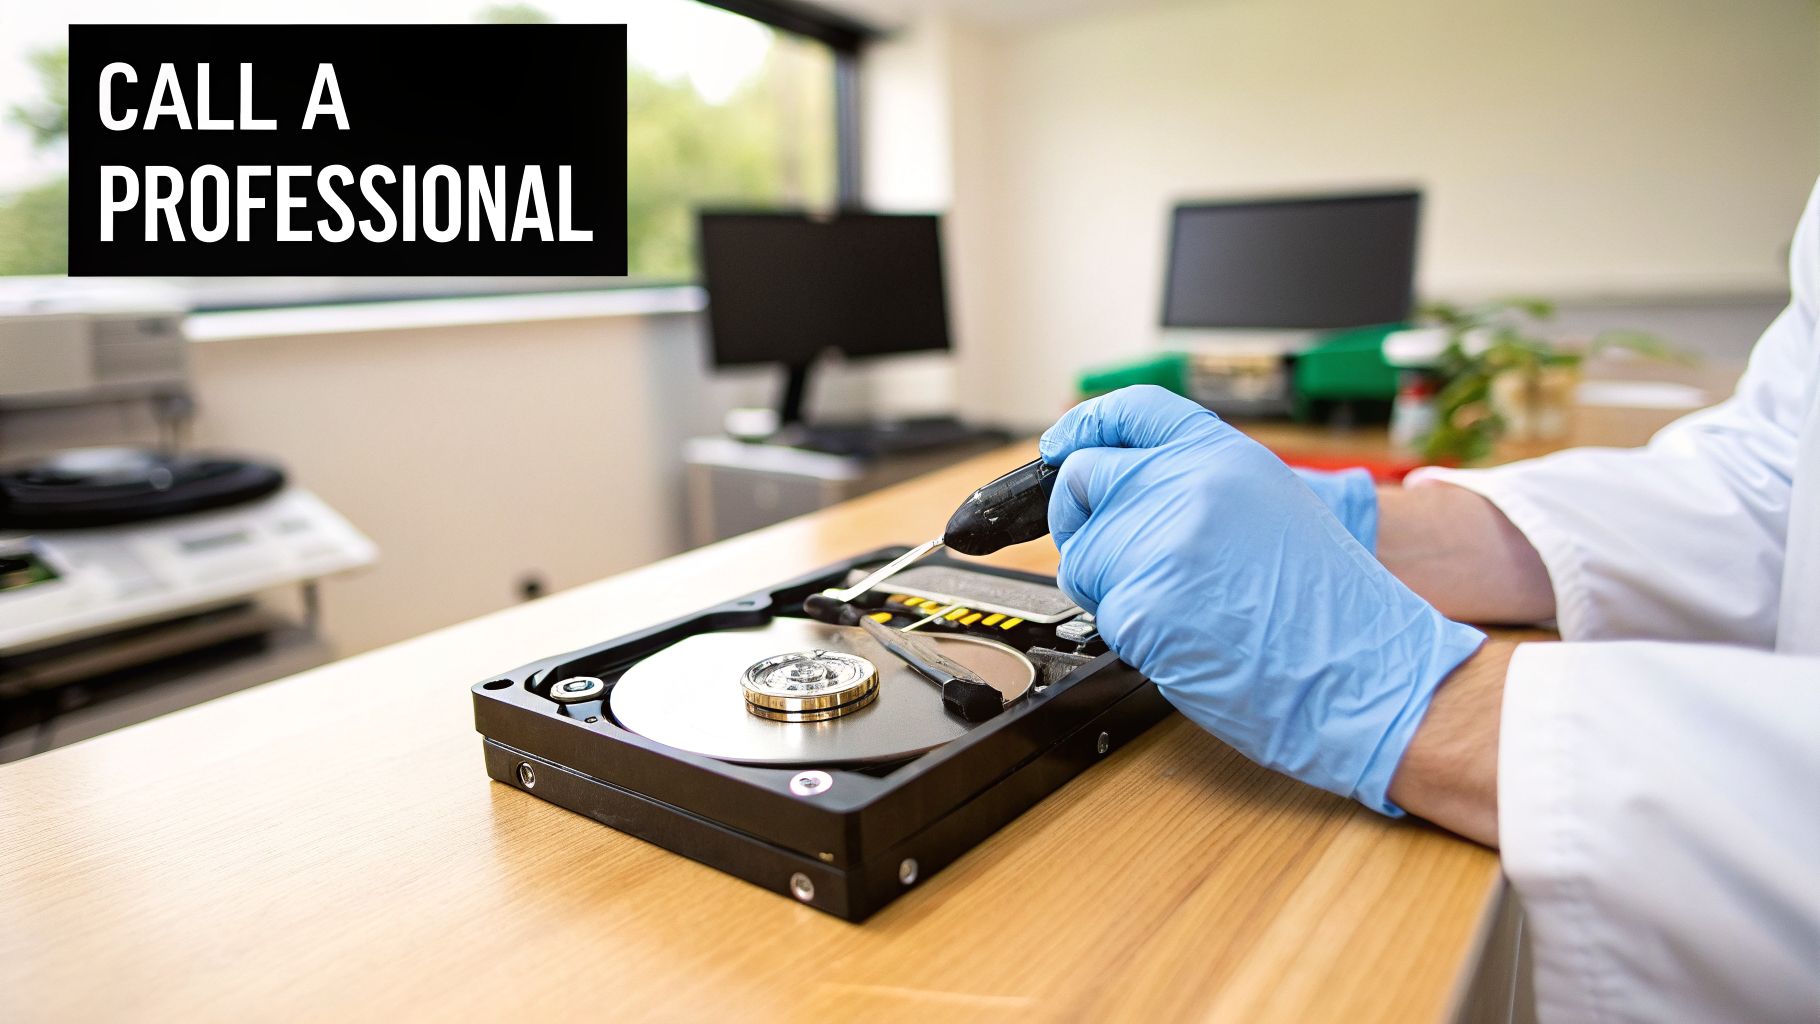
A Look Inside a Professional Recovery Lab
When you hand your drive over to a professional service, it’s entering a world far beyond a home office. The entire process is clinical, precise, and built around equipment you simply can't get on your own.
It all starts with a diagnosis inside a Class 100 cleanroom. This is an environment with fewer than 100 particles larger than 0.5 microns per cubic foot of air. Opening a hard drive anywhere else invites microscopic dust to settle on the platters, which can instantly crash the heads and obliterate your data.
Inside the cleanroom, a technician will:
- Perform a physical inspection by opening the drive to assess the platters, heads, and motor.
- Source and replace damaged parts from a massive library of donor drives to find a compatible head stack assembly or PCB.
- Image the drive with specialized hardware, not a regular computer. These tools can read data directly from the platters, bypassing the drive's faulty firmware and electronics to create a perfect sector-by-sector clone.
This level of repair is just not possible to do at home.
When Crypto Wallets Are on the Line
The stakes get even higher if you're a crypto user. A lost wallet.dat file or seed phrase backup isn't just a missing file—it's a direct, and often irreversible, financial loss. A professional service is frequently the last and only hope.
Top-tier services combine physical repair with deep digital forensics. For instance, if a failing drive holds a lost wallet, their job doesn't end after creating an image. They can physically repair the drive, then use highly specialized tools to scan the raw data, identify fragments of wallet files, and reconstruct them.
This is a far more delicate process than simply recovering a few photos. You can learn more about how a professional recovery service handles these unique cases and what makes crypto recovery a specialized field.
Making the call to stop and get expert help is the single most important decision you can make when your WD drive stops working. It's often the difference between getting your data back and losing it for good.
Frequently Asked Questions About WD Hard Drive Failures
When a Western Digital drive stops working, you need answers fast. Here are our quick, no-nonsense replies to the most common questions we get from users, based on years of real-world data recovery experience.
This isn't just theory—it's practical advice to help you understand what's happening and what to do next without making the problem worse.
Can a WD Hard Drive That Is Clicking Be Fixed at Home?
No. And trying is one of the worst things you can do. That rhythmic clicking noise, often called the "click of death," is the sound of a catastrophic mechanical failure.
It means the drive's internal read/write heads can no longer find the data tracks on the platters. With every click, they swing across the disk and slam back to their starting position. This motion can physically scrape the magnetic layer off the platters, permanently destroying your data.
If your drive is clicking, power it down immediately. Don't plug it in again. Your only safe move is to contact a professional data recovery service that has a certified cleanroom.
Why Is My External WD Hard Drive Light On but Not Showing Up?
This is a problem we see all the time, but it's often a good sign. If the drive's light is on and you can feel or hear it spinning gently, it means the drive is getting power and the core mechanics are likely okay. The issue is probably logical, not physical.
This usually points to one of three things:
- File System Corruption: The index that tells your computer where files are located has become unreadable.
- Driver Problems: Your computer's drivers aren't communicating correctly with the external drive.
- Missing Drive Letter: Windows sometimes fails to assign a letter (like E: or F:), making the drive invisible in File Explorer.
The first thing to do is check Disk Management in Windows or Disk Utility on a Mac. If you see the drive listed there—even as "RAW" or "Unallocated"—it's a strong indicator that the data is recoverable with the right software.
Warning: Your OS might pop up a message saying you need to "format the disk before you can use it." Do not click Format. This erases the drive's file table and makes recovery much, much harder.
How Is Recovering a Crypto Wallet Different from Regular Files?
Recovering a crypto wallet is an entirely different ballgame. It's a high-stakes, two-part mission that standard recovery software just isn't built for.
First, we have to forensically recover the raw wallet file (e.g., a wallet.dat, keystore JSON, or seed phrase backup) from the failing drive. These files are often small and easily missed by generic scans. Second, and this is the crucial part, we have to regain access to the funds by repairing the file or, if the password is lost, using advanced techniques to break the encryption.
Standard data recovery services only do the first part. A specialist is required to successfully complete both.
If a failing hard drive is holding your crypto assets hostage, don't risk them with a generic approach. The experts at Wallet Recovery AI combine deep data recovery knowledge with AI-powered tools designed specifically for restoring access to your funds. See how we can help by visiting Wallet Recovery AI.
Leave a Reply