Hardware wallets are the gold standard for a reason. They work by keeping your cryptocurrency private keys on a dedicated, physical device, completely cut off from the internet. This offline method is called cold storage, and it's what makes your keys highly resistant to online threats like malware, spyware, and remote hacking attempts.
When you need to send crypto, the transaction is signed inside the device itself. Your critical private key never, ever touches your computer or the web.
Disclosure: This article contains an affiliate link. If you purchase through it, we may earn a commission at no extra cost to you.
What Is a Hardware Wallet and Why Does It Matter?
Think of a hardware wallet as a tiny, personal bank vault for your digital money, where only you hold the key. Its entire job is to safeguard your private keys—the secret codes that prove you own your coins and let you spend them—by keeping them totally offline. This physical separation is the whole game, and it’s what makes these devices so incredibly secure.
This is the complete opposite of a software wallet (often called a "hot wallet"), which is just an app running on your internet-connected phone or computer. They're convenient, sure, but that constant online connection leaves them far more exposed.
Hardware Wallets vs Software Wallets At a Glance
To really get the difference, it helps to see them side-by-side. This table breaks down the core security trade-offs between keeping your keys offline versus online.
| Feature | Hardware Wallet (Cold Storage) | Software Wallet (Hot Storage) |
|---|---|---|
| Key Storage | Private keys are stored on a secure, offline physical device. | Private keys are stored in an encrypted file on your internet-connected computer or phone. |
| Connectivity | Only connects to a computer/phone when you need to sign a transaction. | Always connected to the internet, making it accessible but vulnerable. |
| Security | Extremely high. Strong protection against remote malware, keyloggers, and phishing. | Lower. Susceptible to remote hacking, keyloggers, and malware infections. |
| Use Case | Ideal for storing significant amounts of crypto long-term (HODLing). | Best for small amounts of crypto used for frequent trading and daily spending. |
| Convenience | Requires physical access to the device to approve transactions, which is a bit slower. | Very convenient. Transactions can be sent quickly from anywhere with an internet connection. |
| Cost | A one-time purchase, typically between $50 and $200. | Usually free to download and use. |
Ultimately, the choice comes down to your priorities. For anyone holding a serious amount of crypto, the peace of mind offered by a hardware wallet is well worth the investment.
The Core Concept: Cold Storage vs. Hot Storage
The real difference between these wallets boils down to a single, crucial factor: their connection to the internet.
-
Hot Wallets (Software Wallets): These store your keys on a device that's online. Think mobile apps, desktop programs, or browser extensions. Their online status makes them great for quick trades, but it also means your keys are a potential target for hackers and malware.
-
Cold Wallets (Hardware Wallets): These store your keys on a device that is never directly connected to the internet. The wallet is like a secure black box. It receives an unsigned transaction, signs it safely inside, and then passes the signed transaction back—all without your private key ever leaving the device.
A hardware wallet creates an "air gap" between your private keys and the online world. Even if your computer is riddled with malware, the keys remain secure within the physical device, making remote attacks dramatically harder to pull off.
This offline signing process is precisely why hardware wallets are considered the top-tier solution for securing any significant crypto holdings.
How the Security Process Actually Works
The security behind a hardware wallet is built on a simple but brilliant workflow.
It all starts when you set up the device. It generates a seed phrase—a list of 12 to 24 random words—which acts as the master backup for all your private keys. This phrase is created offline and must be written down and stored securely; it should never touch an internet-connected device.
When you want to send funds, you create the transaction on your computer or phone using an app like Ledger Live or Trezor Suite. This unsigned transaction data is then sent to your hardware wallet.
The device shows the transaction details on its own trusted screen, asking you to physically confirm it by pressing a button. Once you approve, it signs the transaction internally using your private key and sends the signed data back to your computer to be broadcast to the network. Your keys never leave the hardware.
One important real-world upgrade: traditional wallets rely on a single seed phrase backup. If you want to reduce “single point of failure” risk (lost seed, one-location backup, inheritance complexity), a split-backup model can be a big advantage. One standout option is Cypherock X1, which is designed to reduce seed-loss risk by using a multi-component recovery approach.
Cypherock X1 (17% Off) — Official Link
Picking the right device often comes down to personal preference, which coins you hold, and what features matter most to you. Our detailed hardware wallet comparison is a great place to start exploring the differences between top models. This layered security model—offline keys, a trusted display, and physical confirmation—is what makes these little devices a true fortress for your digital wealth.
Understanding Private Keys and Seed Phrases
To really get how hardware wallets work, we have to start with the two things they're built to protect: your private keys and your seed phrase. These are the bedrock of your crypto ownership. If you don't get this part right, nothing else matters.
Think of your crypto address on the blockchain as a digital vault. Your private key is the only key on earth that can open it. It's a long, messy string of random characters, and whoever has it holds absolute power over the funds inside.
Because that key grants total control, letting it fall into the wrong hands is the single biggest risk you face in crypto. If a hacker gets your private key, your assets are gone. It's that simple, and it's irreversible. This is precisely why hardware wallets exist—to create this key and then lock it down so no one can ever touch it.
The Role of Your Private Key
When you first set up your hardware wallet, it generates your private key. The crucial part? This all happens completely offline, inside the device's own secure environment. The key is born inside this digital fortress and is designed never, ever to leave.
So when you want to send some crypto, the wallet uses this internal key to mathematically "sign" the transaction, proving you're the one who authorized it. But the key itself never sees the light of day. It never touches your computer, your phone, or the internet.
This complete isolation is the core promise of a hardware wallet. It transforms your key from a vulnerable piece of data into a guarded, untouchable secret.
What Is a Seed Phrase?
Okay, so what if you lose your hardware wallet, or it gets stolen or just plain breaks? The private key is locked inside that now-useless device. Is your crypto gone forever?
Thankfully, no. This is where your seed phrase saves the day.
If a private key is the key to a single vault, the seed phrase (sometimes called a recovery phrase) is the master blueprint for rebuilding your entire set of keys from scratch. It’s a list of 12 to 24 simple, randomly generated words that can restore all your private keys on a brand-new device.
A seed phrase is your ultimate backup. It is the single most important piece of information you will own. With it, you can recover your entire crypto portfolio on any compatible wallet. Without it, losing your device means losing your funds forever.
This incredibly powerful backup is created during the same offline setup process. The device shows you the words one by one, and it becomes your job to write them down—on physical paper or metal—and store them somewhere ridiculously safe. For a more detailed look into how these phrases work, you can explore our guide on the wallet seed phrase for a deeper understanding.
Protecting Your Ultimate Backup
Here's the hard truth: your hardware wallet's security is only as strong as how well you protect your seed phrase. If someone finds that piece of paper, they don't need your device at all. They can just type those words into their own wallet and drain your accounts completely.
So, here are the non-negotiable rules for handling your seed phrase:
- Never Store It Digitally: Don't take a picture of it. Don't save it in a text file, email it to yourself, or put it in a password manager. Any digital copy is a target for hackers.
- Write It Down Physically: Use a pen and paper at a minimum. Even better, use a steel plate designed for seed phrases to protect it from fire or water damage.
- Store It Securely and Secretly: Hide your written phrase somewhere safe from theft, damage, or snooping eyes. Think a fireproof home safe or a bank's safe deposit box.
- Don't Say It Out Loud: Avoid reading your phrase aloud, especially when devices with microphones (like your phone or a smart speaker) are nearby.
- Verify Your Backup: Most hardware wallets have a feature to check if you wrote the phrase down correctly. Use it. Make sure every word is right and in the exact order.
Getting these two concepts down is essential to understanding hardware wallets. The device is the day-to-day bodyguard for your private keys, while the seed phrase is your doomsday recovery plan, putting the final responsibility for your wealth right where it belongs: in your hands.
Inside the Digital Fortress: Secure Elements and Firmware
So, what really makes a hardware wallet a fortress for your crypto? It’s not just that it’s offline. The real security comes from purpose-built components working together to create an isolated environment for your keys. It all comes down to two things: the Secure Element and the device's firmware.
Think of a Secure Element (SE) as a tamper-resistant vault inside the device. It's a dedicated security chip engineered to resist both physical extraction attempts and advanced software attacks. This same category of security hardware is used in things like passports and high-security payment systems.
Your private keys are generated inside this secure environment, stored there, and used there for signing. The key material is designed not to be exportable.
The Role of the Secure Element Chip
The Secure Element performs cryptographic operations—like signing—without revealing the private key. Transaction data goes in, a signature comes out. The key itself stays locked away.
The Secure Element is what makes the “keys never leave the device” promise a physical reality. It’s engineered so cryptographic secrets don’t leak out, even if your connected computer is compromised.
This isolation is the bedrock of hardware wallet security and provides a level of protection software wallets can’t match.
Verifying Authenticity with Firmware Integrity Checks
While the Secure Element guards keys, the device firmware must also be trustworthy. Genuine hardware wallets use cryptographic integrity checks (secure boot) to verify that the firmware hasn't been altered. If the check fails, the device can warn you or refuse to operate.
This is one reason buying from official sources matters: you reduce supply-chain risk and ensure the device can validate itself properly.
These two components—a hardened security chip and self-verifying software—form a powerful one-two punch. The Secure Element secures the keys; firmware checks help ensure the device itself is authentic and uncompromised.
How Offline Transaction Signing Actually Works
This is where the real magic of a hardware wallet happens. Its entire security model is built around a carefully designed process called offline transaction signing. It guarantees your private keys never touch the internet, even when you're sending crypto.
I like to compare it to a secret rubber stamp locked inside a tiny, impenetrable safe. To approve a document, you slide the paper through a slot, an internal mechanism stamps it, and the now-approved document slides back out. The stamp itself—your private key—never leaves the safe. This creates an "air gap" between your keys and your internet-connected computer.
Let's walk through exactly how this works with a real-world example, like sending some Bitcoin to a friend.
Step 1: You Create the Transaction on Your Computer
First, you’ll open up the companion software on your computer or phone, like Ledger Live or Trezor Suite. This app is your command center for managing your crypto.
From here, you’ll kick off the transaction by entering three key details:
- The Amount: How much Bitcoin you're sending.
- The Recipient's Address: Your friend's public Bitcoin address.
- The Transaction Fee: How much you'll pay network miners to process it.
At this point, all you've done is create an unsigned draft of the transaction. It's like writing a check but not signing it yet—it can’t be executed without your approval.
Step 2: The Software Sends the Unsigned Data to Your Wallet
Next, the app sends this unsigned transaction data over to your hardware wallet, which you’ve connected via USB or Bluetooth.
Step 3: You Verify Details on the Trusted Display
This is the most important security check in the whole process. The transaction details you typed on your computer screen now show up on your hardware wallet’s trusted display.
The trusted display is your last line of defense against malware. If a virus on your PC secretly swaps the recipient address, the hardware wallet screen shows what you’re actually signing.
You should verify the amount and the recipient address match your intention before approving.
Step 4: You Physically Approve the Transaction
Once everything looks correct, you approve it by pressing physical buttons (or using the device touchscreen). This is a simple but powerful protection: malware can’t press buttons for you.
Step 5: The Wallet Signs the Transaction Internally
After approval, the wallet uses your private key (stored securely inside) to generate a digital signature—inside the device.
Step 6: The Signed Transaction Is Sent Back
Finally, the wallet sends only the signature back to your computer, which then broadcasts the complete transaction to the blockchain network.
This separation—transaction creation on the computer, signing on the hardware wallet—is what makes the model so robust.
Connecting Your Wallet to Web3 and DeFi Apps
A hardware wallet is more than a vault; it’s a secure passport to Web3. When you pair your hardware wallet with an interface like MetaMask, MetaMask can build transactions—but it must hand off the signing to your hardware device.
You review details on the device’s trusted screen and physically approve. The wallet signs offline and returns only the signature. Your private keys remain isolated.
This flow diagram breaks down that core offline signing process that keeps you safe.
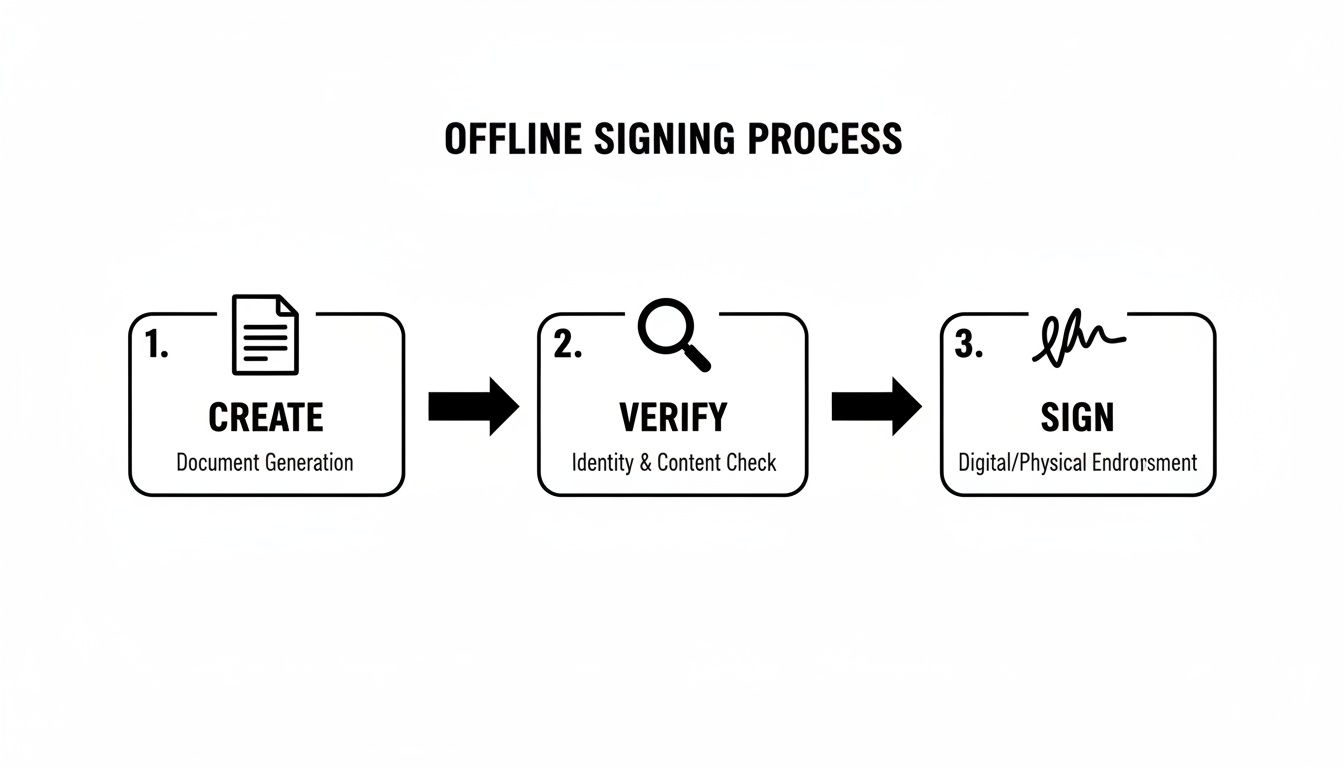
Hardware wallets connect via USB or Bluetooth. The crucial part is that signing always happens on the device—plus you get the human verification step of checking details on the wallet screen before you confirm.
Using a hardware wallet turns a hot wallet interface into a safer “transaction builder.” The interface can prepare transactions, but the hardware wallet keeps final approval under physical control.
A Few Common Questions About Hardware Wallets
What Happens If My Hardware Wallet Is Lost, Stolen, or Just Dies?
If your hardware wallet is lost, stolen, or broken, your crypto is still safe—as long as your recovery seed phrase is safe.
Your funds aren’t on the device. They exist on the blockchain. The wallet holds the keys. With your seed phrase, you can restore access on a new compatible device.
- Buy a new hardware wallet.
- Select “restore” or “recover” during setup.
- Enter your 12 or 24-word seed phrase in the correct order.
This is why protecting your seed phrase is even more important than protecting the device itself.
Is a Hardware Wallet Totally Immune to Every Attack?
Hardware wallets defeat the most common and devastating threats—malware, phishing, and remote compromise—but no solution can eliminate every risk. Supply-chain attacks and physical coercion are real-world concerns, which is why buying from official sources and using advanced features (like passphrases) matters.
A hardware wallet neutralizes everyday digital threats. Total security is always a partnership between strong technology and strong habits.
Can I Use the Same Hardware Wallet for Different Cryptocurrencies?
Yes. Most modern devices are multi-currency wallets. You typically use a companion app to manage assets and install specific blockchain apps (Bitcoin, Ethereum, Solana, etc.) while keys remain isolated inside the device.
Does My Hardware Wallet Need to Be Connected to the Internet?
-
The hardware wallet itself: No. It is designed to stay offline.
-
The computer/phone interface: Yes. It needs internet access to read balances from the blockchain and broadcast signed transactions.
If you've lost access to a wallet and need expert help navigating the recovery process, Wallet Recovery AI offers specialized services to restore control over your digital assets. Using advanced, secure techniques, we can help with forgotten passwords, corrupted files, and other access barriers for a wide range of wallets. Learn more and start your recovery process at walletrecovery.ai.
Leave a Reply